Chapter 2: Protocols, Subjects, and Studies
Continuing from Chapter 1 — Installation and First Launch.
Before importing any data, it helps to understand how Brainstorm organizes everything it stores — three nested levels that every file in the Database Explorer tree belongs to.
The three levels
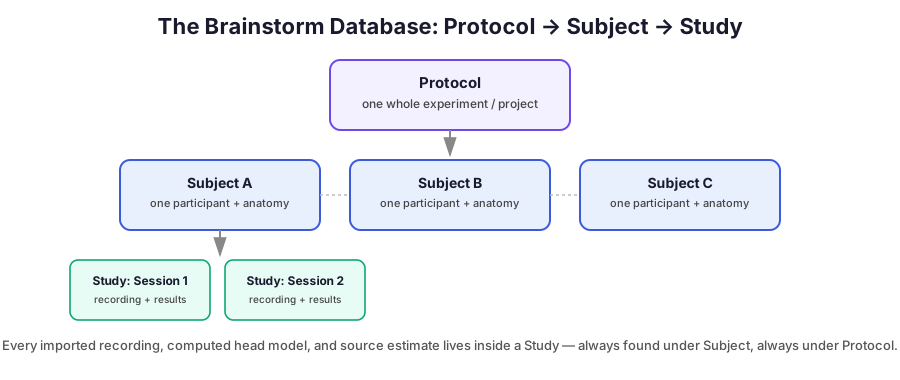
- Protocol — the top level, roughly "one whole project." Create a new one via File > New protocol. A protocol typically corresponds to one experiment or one dataset you're analyzing.
- Subject — one participant inside that protocol, including their anatomy (a real MRI-derived brain surface, or a default template like Colin27/ICBM152 when no individual MRI is available). You'll create one subject per participant.
- Study — a folder inside a subject holding one recording session and everything derived from it: the raw import, filtered copies, epochs, head models, source maps. Every process you run creates a new file inside the relevant study — nothing happens invisibly.
Individual anatomy vs. a template
When creating a subject, Brainstorm asks whether you have that person's own MRI (segmented via FreeSurfer, BrainSuite, or CAT12 — Brainstorm can import the output of any of these) or want to use a default anatomy — a standard template brain. Using a template is completely valid for EEG and for getting started with MEG; it's simply less anatomically precise for that individual than their own scan would be. Chapter 6 revisits this choice, since it affects source localization accuracy.
Why this structure matters in practice
Every button you click later in this track produces a new file inside a Study rather than modifying anything in place — filter a recording and you get a second file next to the original, both visible in the tree, so nothing is ever silently overwritten. Getting comfortable reading this tree — which protocol, which subject, which study, which file — is most of what "navigating Brainstorm" means day to day.